Software by Mike Robinson   
Drive Inventory
Make an Excel spreadsheet of all your files

Download
DownloadDownload     HomeHome     PurchasePurchase    

Drive Inventory makes an Excel spreadsheet of all the files on your hard drive. The Excel file can have up to 1,048,576 rows in Excel 2007 or later. In Excel 2003 and earlier the limit is 65,536 rows. If these limits are exceeded, then additional worksheets will be added so that all files are included.

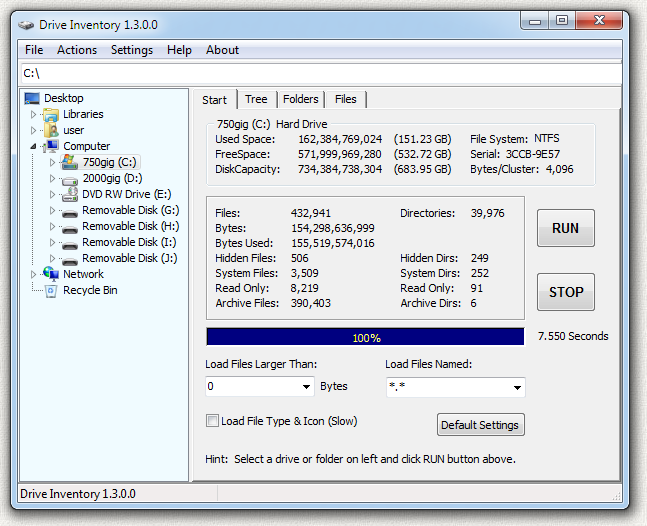
Fast, fast, fast. Drive Inventory is very fast. In the image above you can see 433,000 files were loaded in less than 8 seconds. This speed is possible because the files were cached in memory. The first run was slower as the files were read from the slow hard drive. This example shows that the overhead of the program operation adds less than 8 seconds. It takes only 8 seconds to load these files into 3 separate tree structures: files only, folders only, and full tree. About one million files were added to these trees in seconds. I think Drive Inventory is the fastest program of this type in the world.

You can also put the list into a web page, a text file, a rich text file, or an image file (JPG, GIF, or BMP). You can inventory a whole drive or just one folder. Sort the entire list in seconds. Sort by date to find your oldest files or sort by file attribute to find all your hidden or system files. Use a file mask such as *.jpg to find all your photos. Use size limits to find files larger than 1 megabyte or any limit you choose.

Get detailed information about each file or folder, change attributes, open it, copy it to the clipboard, or delete it. Folders will open in Windows Explorer and files will open in the default program for that file type. You can also view the file contents, search for files, rename files, or do a batch rename of all selected files.

There are 3 tabs: one for a complete file tree, one for files only, and one for folders only. Grab the headings and move the columns around to any order. Right-click on the headings to add or remove columns.

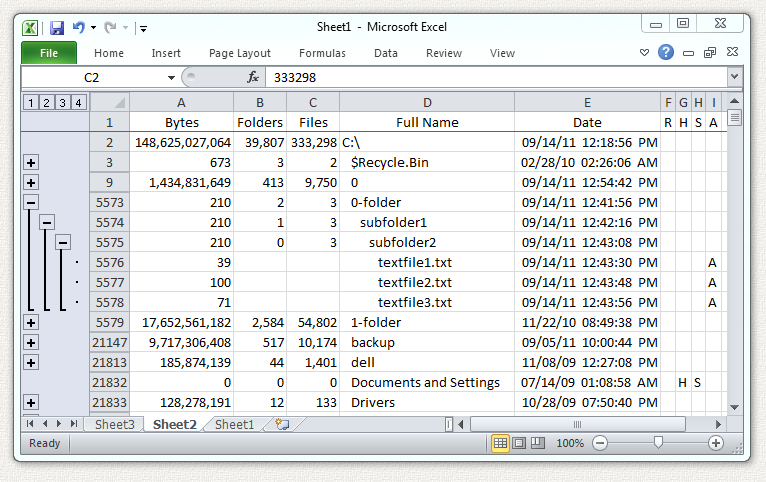
Here is an example of the Excel spreadsheet. It uses Excel data grouping to construct a tree just like on your drive. You can click on the small plus sign (+) on the left of each row and that folder opens to show its contents. The folders are grouped like a tree just like on your hard drive. Below you can see the folder "0-folder" contains folder "subfolder1" that contains the folder "subfolder2" that contains 3 files "textfile1.txt," "textfile2.txt," and "textfile3.txt" The name of each folder is indented as you move down through the levels and the level is shown on the left.

This is a 32-bit program and will run on Windows XP, ME, NT, 2000, Vista, Windows 7, Windows 8, and Windows 10.   It also runs fine on 64-bit systems.

See the bottom of this page if you would like to purchase Drive Inventory for just $20.00 (Twenty US Dollars). This trial version will operate for 14 days. If you purchase the program, I will send you a serial number by email that will enable continued operation with no time limit. Pay once and all future upgrades are free. Your serial number will work with all future versions. This demo version is fully functional. No features have been removed. It contains no spyware, no advertising.

See below for installation instructions.

The 3 Main Program Tabs

The Tree Tab in the program below shows all the files arranged in a tree. The left pane shows this is a display of the C drive. The right pane shows the contents on C drive. Click on the small plus sign next to each folder and it opens to show the contents of that folder. The Expand, Collapse, and Number buttons cause the tree to open of collapse the various levels for the entire tree. The numbered buttons open to the level of the button. For example, the "3" button opens all the folders in the tree to 3 levels deep. The small arrow at the top of the "Bytes" column shows that it is sorted by number of bytes so the largest folders are grouped at the top. Click on the top of any column and it sorts by that column. Click the top of the column again and it sorts in the opposite direction. The example below contains almost 500,000 files and it can sort this list in seconds. Sort by size to find the largest files or folders. Sort by date to find the oldest or newest. Sort by attribute to find all your hidden or system files and folders. You can also click and drag each column to arrange them in any order you choose. Right-click on the top row and you can turn the columns on or off by clicking on the column names in the drop-down menu.

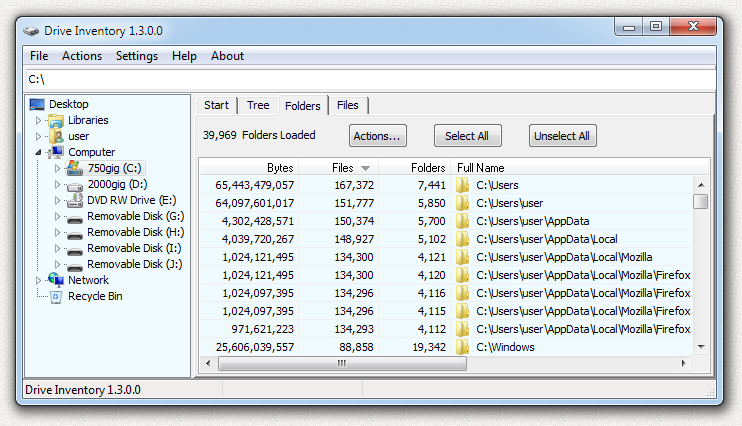
The Folders Tab below shows just the folders. They are sorted by the number of bytes in each folder with the largest folders at the top. Click on the top of any column and it sorts by that column. Click the top of the column again and it sorts in the opposite direction. You can also click and drag each column to arrange them in any order you choose.

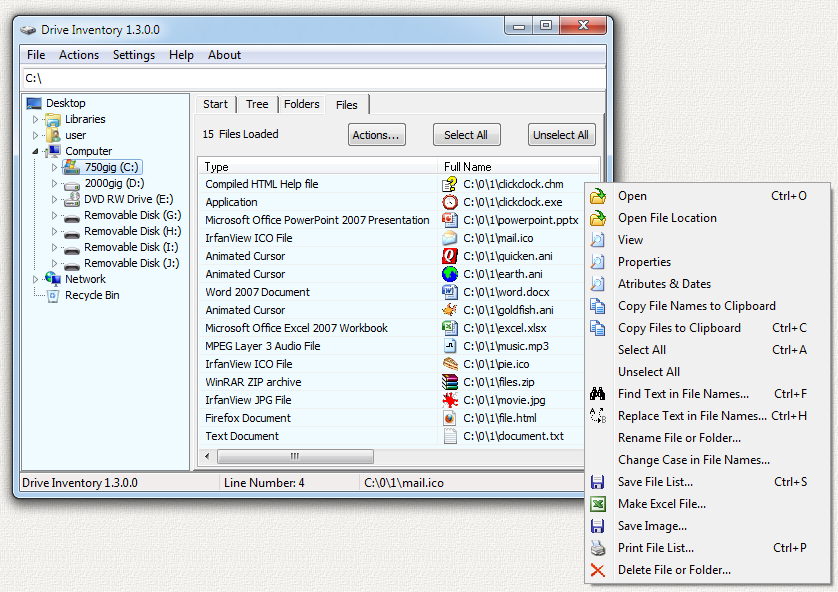
The Files Tab below shows just the files. It also shows each file icon and type name. They are sorted by file size with the largest files at the top. Click on the top of any column and it sorts by that column. Click the top of the column again and it sorts in the opposite direction. You can also click and drag each column to arrange them in any order you choose. The "R" column shows the Read attribute, the "H" column shows the Hidden attribute, the "S" shows the System attribute, and the "A" shows the Archive attribute.

Program Operation

The program opens on the "Start" tab shown below:

Use the left pane to navigate to a drive or folder. Then press the RUN button on the right. Then relax and have a cup of coffee or an adult beverage. This may take a few minutes if you are counting an entire drive. If you change your mind press the STOP button and the count will stop. Once the count finishes or stops you can switch to the other tabs to view the Tree, Folders, or Files information. The time elapsed is shown to the right of the progress bar.

At the bottom of the right pane are several count options:

Load Files Larger Than - Set the minimum file size to load using this drop-down box. Only files larger than this will be loaded in the lists on the other tabs. All the files and folders will still be counted, but files smaller than this value will not be listed. The program runs faster if it does not have to load all the files. Set this value to 0 (zero) if you want a list of all your files.

Load File Type & Icon - Check this box to display the file icon and type name in the Files list. Checking this box will slow down the program. It runs faster if it does not have to load the file icon and type name.

Load Files Named - Set file names to load using this drop-down box or type in any file name. Leave default value of *.* to load all files. If you set this to *.doc then only files with extension of .doc will be loaded. All the files and folders will still be counted, but files that do not match this name will not be listed. The program runs faster if it does not have to load all the files. You can use Windows file name wildcards * (any name) and ? (any character) in the file name.

Default Settings - Click this button to restore the default values for the options above and for all of the columns on the Tree, Folders, and Files tabs. If you don't like these settings, then on the top menu select "Settings" and uncheck the "Save Settings on Exit" line item and restart the program and you will get your previous settings back.

Another way to restore the default settings is to start the program with a   /C   command line parameter like this:

DriveInventory   /C

File Operations

These File operations can be used in the Tree tab, the Folders tab, or the Files tab. Select the files/folders by clicking on them so they are highlighted and then use the command.

Right click on a file or folder in the program and the menu below pops up. Or press the Actions button or menu item near the top.

In the example above I right-clicked on the file "clickclock.chm" and the File Operations menu dropped down.

Open - Opens the file using the program associated with this file. If it is an image file, it will open in the image viewer for that file type. If it is a program file, the program will run. If it is a folder then the folder will open in Windows Explorer.

Open File Location - Starts Windows Explorer and opens the folder containing the file. If a folder is selected it opens in that folder.

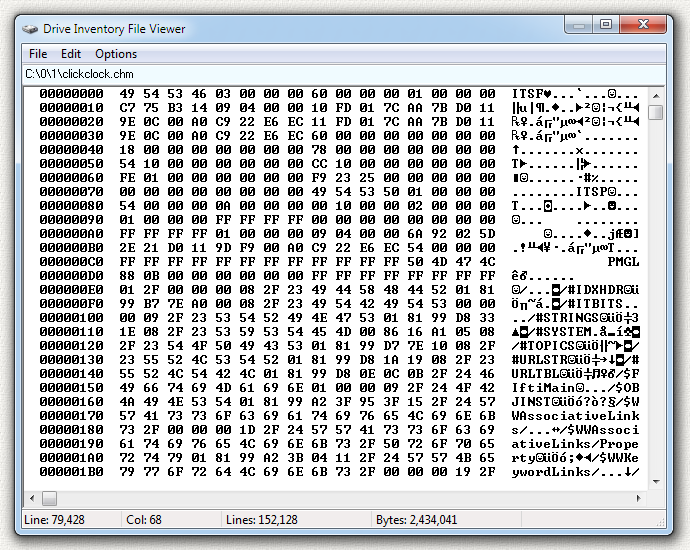
View - Opens the file in the Drive Inventory File Viewer in hexadecimal mode:

You can also view the file in filtered hexadecimal mode or plain ascii text mode.

Properties - Opens the normal Windows property screen for this file or folder exactly like you see in Windows Explorer.

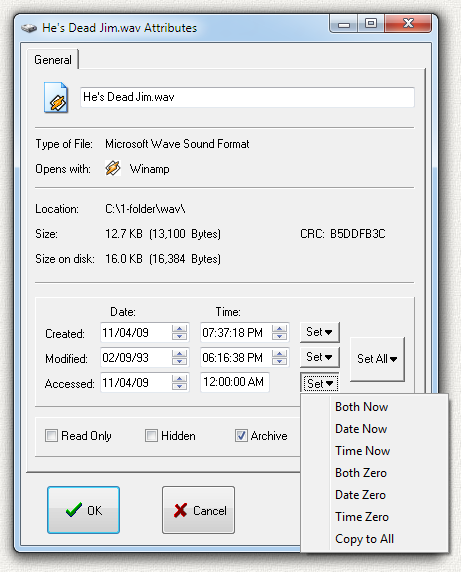
Attributes & Dates - Opens a special Attributes and Dates screen shown below. Here you can change the file attributes using the check-boxes along the bottom. Change the date/time the file was created/modified/accessed using the spin buttons, or by typing in numbers. You can also use the drop-down Set buttons to set the date/time to today or to zero, or to copy the same date/time to all of the other date/time boxes.

Copy File Names to Clipboard - Copies the file names of any combination of files and/or folders to the Windows Clipboard. These can then be pasted into other programs.

Copy Files to Clipboard - Copies any combination of files and/or folders to the Windows Clipboard. These can then be pasted into other programs. Copying a folder copies the entire folder and all the files/folders contained within that folder.

Select All - Selects all of the files in the tree. Can be used in the tree tab, folders tab, or files tab.

Unselect All - Clears all of the selections in the tree. Can be used in the tree tab, folders tab, or files tab.

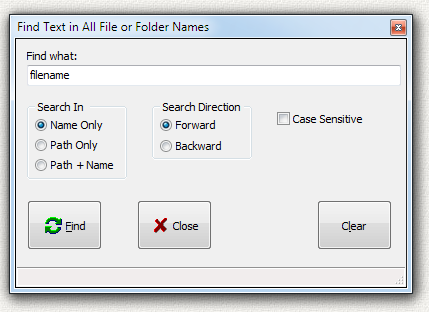
Find Text in File Names - Use this command in any of the 3 trees. Opens the Find Text screen shown below. Put in the search text and press the search button. The program moves to the first matching file or folder. You can search in the name only, the path only, or both path and name. Search forward or backward in the tree. Check the box to do a Case Sensitive search. Press the search button again to find the next matching file or folder. Once a file or folder is found you can run any of the file operations on that file.

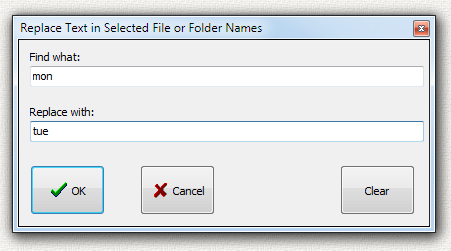
Replace Text in File Names - This allows you to rename many files or folders in one operation. Select the files or folders and then use this command. The screen below appears. For example, you could replace the word "mon" with the word "tue" as shown in all of the selected file or folder names.

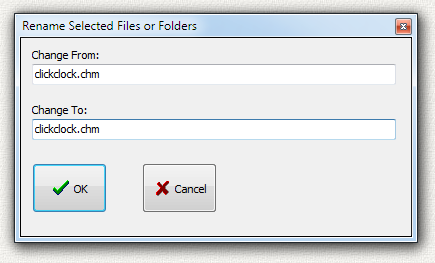
Rename File or Folder - This allows you to rename a single file or folder. Select the file or folder and then use this command. The screen below appears. Type in the new name and press the OK button.

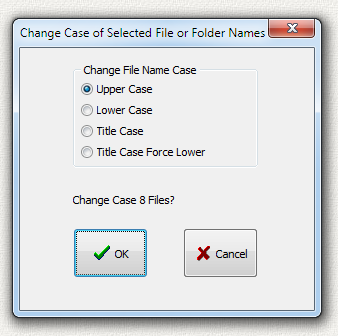
Change Case in File Names - This allows you to change the case of the file names of many files or folders in one operation. Select the files or folders and then use this command. The screen below appears. Choose Upper Case, Lower Case, Sentence Case, or Sentence Case Force Lower case.

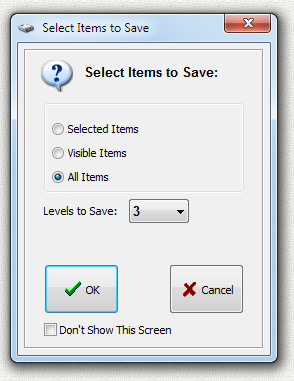
Save File List - Save the data from all of the loaded files to a file. This option applies to all of the files loaded, not just the file selected. This screen will popup:

Select whether you want to save the data for the Selected Items, Visible Items, or All Items. If you are on the tree tab you can also select the depth of the tree that will be saved. If you select 3 then the tree will include all files down to 3 levels from the top. Next you can choose to save the file in any one of the following 6 file types:

Text - Space Delimited (*.txt)
Text - SemiColon Delimited (*.txt)
Text - UniCode (*.txt)
CSV - Comma Delimited (*.csv)
Web Page (*.html)
Rich Text Format (*.rtf)

Here is an example of the Space Delimited Text file opened using Windows Notepad:

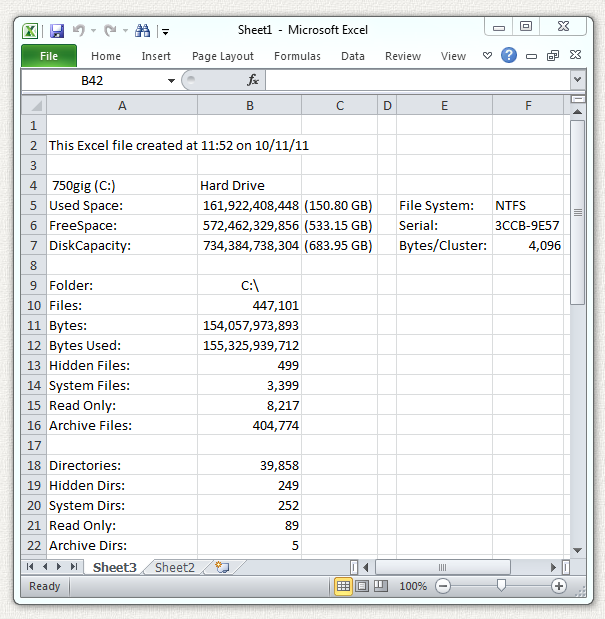
Make Excel File - Save the data from all of the loaded files to a Microsoft Excel file. This option applies to all of the files loaded, not just the file selected. You must have Excel loaded on your PC to use this option. The Excel file has 2 sheets that look like this:


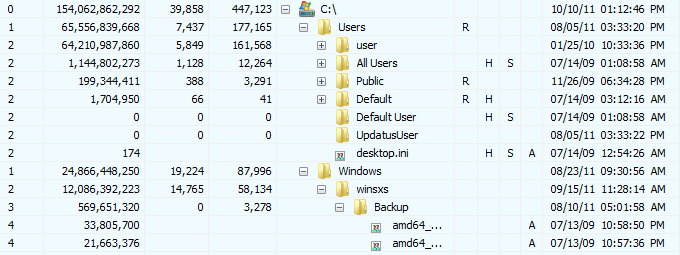
Save Image - Save an image of the current screen tab to a BMP, or JPG, of GIF Image file. Here is an example of the image of the Tree tab:


Print File List - Print a list of all the files on the current tab.

Expand Node - If you are on the Tree tab the currently selected node (folder) will be opened and expanded. This is the same as if you click the plus sign to the left of the folder on the Tree tab.

Collapse Node - If you are on the Tree tab the currently selected node (folder) will be collapsed. This is the opposite of Expand.

Install

As an Administrator run the program driveinventory-setup.exe to install the program. The install program will overwrite any previous version so you are not required to uninstall older versions. The install program will create a folder, copy all the files to the folder, and create shortcuts on the desktop and the start menu. This is a 32-bit program designed for Windows 98, ME, 2000, NT, XP, Vista, Windows 7, Windows 8, and Windows 10. It also runs fine on 64-bit systems. The installed size of the program is less than 2 megabytes. The program saves its settings in the Windows Registry when you exit from the program.

An alternate install method is to download the executable file driveinventory.exe and then just run the program. You can create your own Desktop Shortcut or other shortcut links.

UnInstall

Open Windows Control Panel, select Programs and Features, select the program in the list of programs, and click the uninstall button, or right click on the program and select Uninstall in the menu. The Windows uninstall system will then run and remove the program. These steps are for Windows 10 and may be slightly different in other Windows versions.

If you installed the program manually then delete the files to uninstall the program, and also delete any Desktop Shortcut or other shortcut links.

Then delete this entire key in the Windows Registry :

HKEY_CURRENT_USER\SOFTWARE\Michael_Robinson\DriveInventory

Saved Settings

When the program closes it remembers all of its settings by saving them in the Windows Registry. It saves the size and location of the program on your desktop. The next time you use the program it will open the same drive or folder used in the last Drive Inventory.

Support

Send your questions and comments to: ElegantPie@HotMail.com

I fully support this program and will usually answer within 24 hours.

The latest version is always available on my Home Page:

https://elegantpie.com

Legal Stuff

This program is Copyright © 2006 Michael Robinson.  All Rights Reserved.  Use this program at your own risk.   If you purchase this program, and are not satisfied with it for any reason, I will refund your money.  You may give this file away free, but you may not sell it.  It must be distributed as a package along with all files.  Modification of the executable file is prohibited.

Revision History

1.0.0 Nov 12, 2006 Initial Public Release.
1.2.0 May 30, 2007 Windows Vista update.
1.2.3 Jan 30, 2010 Windows 7 update.
1.3.0 Dec 11, 2011 Million-Row Excel Files, Search, Rename.
1.3.1 Jan 10, 2016 Fixed Windows 10 identification in created diagnostic email.
1.3.2 Sep 19, 2016 Changed help file to driveinventory-help.mht.
1.3.4 May 15, 2017 File creation time now same as in Windows Explorer.
1.3.5 Sep 26, 2020 Added support for drives visible on network.
1.3.6 Aug 08, 2021 Digitally Signed driveinventory.exe and driveinventory-setup.exe. Help file: driveinventory.pdf.

1.4.0 Oct 22, 2021 Removed network drive support to fix false threat report in MSDefender. I can send you the previous version if you need network support.


You must have Excel 2007 or later to create million-row excel files.

65,536   Excel row limit (per worksheet) in versions prior to Excel 2007.

1,048,576   Excel row limit (per worksheet) in Excel 2007 and later.

If these limits are exceeded, then additional worksheets will be added so that all files are included.


Digital Signature

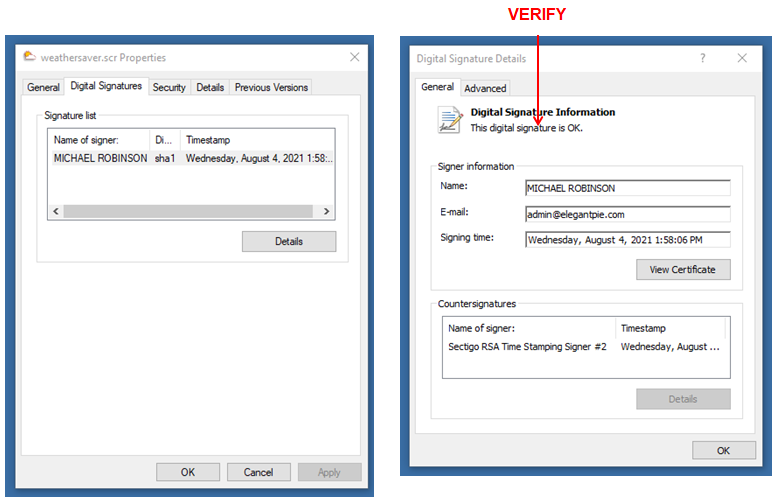
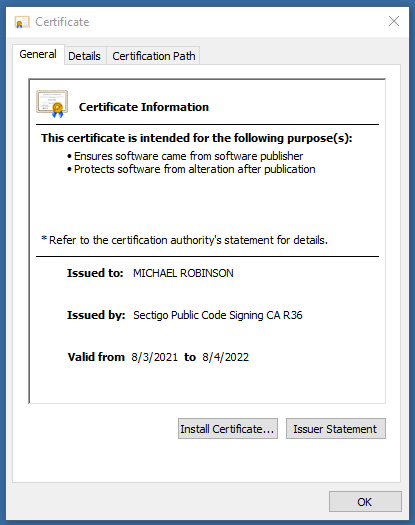
I purchased a Code Signing Certificate from Certificate Authority (CA) company Sectigo and used it to digitally sign (and timestamp) program executable file driveinventory.exe and install program driveinventory-setup.exe. The signature says it was signed by MICHAEL ROBINSON. Code Signing proves that the program actually came from me and has not been modified by a hacker since it was signed.

Run Windows File Explorer (explorer.exe) right click on the file and select Properties:


Then click on the tab Digital Signatures, and click the Details button:


Then click the View Certificate button to see my certificate:

If even one byte is changed, either in the file or in the signature, the signature will show as invalid in the file properties.


Purchase    

If you purchase this program, and are not satisfied with it for any reason, I will refund your money.

This trial version will operate for 14 days. If you purchase the program, I will send you a serial number by email that will enable continued operation with no time limit. Pay once and all future upgrades are free. Your serial number will work with all future versions. This demo version is fully functional. No features have been removed. It contains no spyware, no advertising.

The purchase price is $20.00 (Twenty) US Dollars. I accept major credit cards, PayPal , or personal checks. Press one of the links below and your browser will open and go to PayPal with all the purchase information already filled out. You can use PayPal to pay by credit card even if you do not have a PayPal account. The total cost to you is $20.00. No fees. Use your Visa, Mastercard, American Express, or Discover card.

Pay with credit card or PayPal Use your Credit Card.

Pay with credit card or PayPal Or send payment by PayPal payable to: ElegantPie@HotMail.com

Or send personal check or money order payable to Michael Robinson:

Michael Robinson
PO  Box  95
Shelton,  CT  06484

Official PayPal Seal   I am PayPal Verified.   My Account Creation Date is May 30, 2000.   Yes, I have been using this PayPal account for over TWENTY years.

The Official PayPal Verified Seal above means that I have provided PayPal with proof that I have a bank account and that my address is valid. Banks are required by law to screen account holders so PayPal's verification process increases security when you pay parties you do not know. My bank has my address and Social Security number on file. I have been using PayPal for over 20 years.

I use PayPal because the fees are low. If you send me $20.00 PayPal only takes about $1.00 so I net $19.00. All other payment services take several dollars so I would have to charge around $25 for my program to gain the same net. This lowers the cost to you. PayPal does not charge you any fees. PayPal is also free for me for most purchases, such as Ebay auction payments, but as a seller I am required to have a Premier Account with fees. If you do not have a PayPal account, you can still use PayPal to make a payment using your credit card. PayPal does not charge you any fees for this. PayPal is a very secure and reliable payment system used by millions of people around the world.


DOWNLOAD       PURCHASE    HOME    EMAIL   


elegantpie@hotmail.com

https://elegantpie.com

only elegantpie.com