 Download
Home
Purchase
Download
Home
Purchase
| Software by Mike Robinson |
Download
Home
Purchase
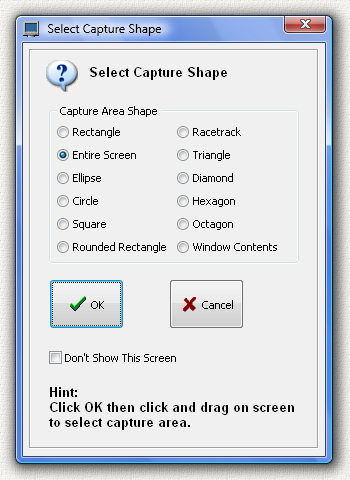

 to pick a new shape and then press the retry button.
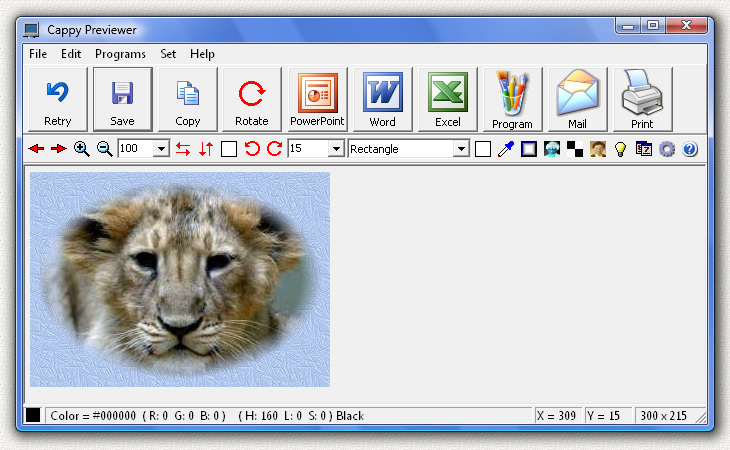
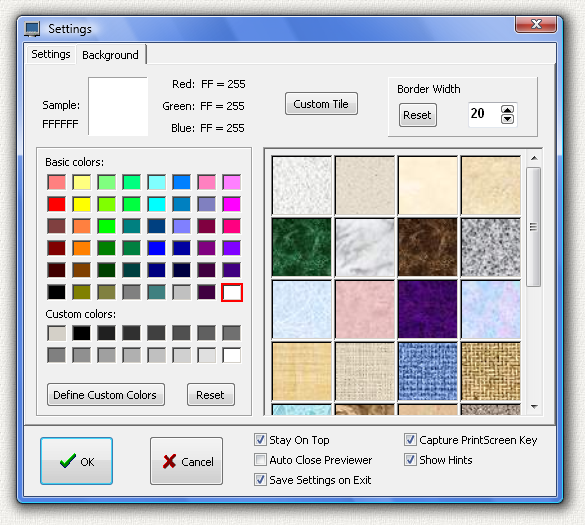
 Save the captured image as a file. You can choose from a BMP, JPG, GIF,
or PNG file. You will get the best image quality using a BMP file, but the JPG file offers a much smaller file size. The GIF file is also fairly small, but the format is limited to 256 colors so you may see some color distortion. The PNG file is usually about the size of the JPG file but I think the image quality is better than JPG.
Save the captured image as a file. You can choose from a BMP, JPG, GIF,
or PNG file. You will get the best image quality using a BMP file, but the JPG file offers a much smaller file size. The GIF file is also fairly small, but the format is limited to 256 colors so you may see some color distortion. The PNG file is usually about the size of the JPG file but I think the image quality is better than JPG.


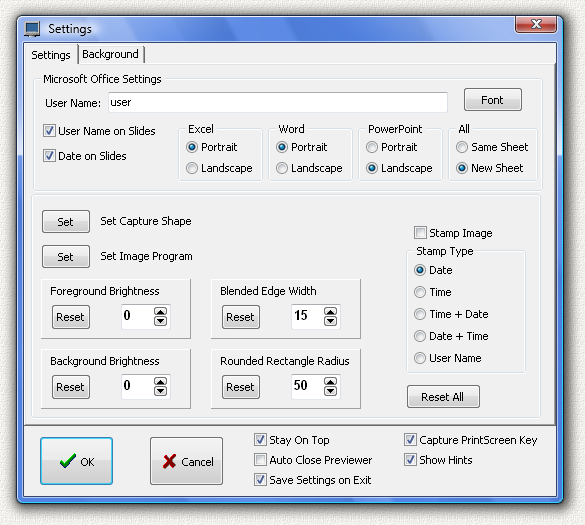
 just below the big copy button. With clipping on, the edges of the image will be clipped when rotated. If the image is not clipped, the "extra" space will be filled by the background color. If you are using a pattern background, then the fill color will be the last solid color selected before the pattern was selected. If you select a background color that is the same as the background in the image, then the borders of the image will be invisible when rotated. You can pick the background color from the screen using the "Pick Background Color on Screen" button which looks like an eyedropper like this
 just below the big program button.
 Opens Microsoft PowerPoint, creates a slide, and then puts the image on the slide. PowerPoint will open in Landscape mode (wide) if you have the PowerPoint
Landscape
item checked in the "Settings" form, or in Portrait mode (tall) if you have the PowerPoint
Portrait
item checked.
It can also place a line of text in an editable text box on the lower left, and the date on the lower right. You can turn these text boxes on or off in the
Settings
form. The lower left text box can be customized in the purchased version only. Once the slide is created both text boxes can be edited or erased in PowerPoint. You can then do any of the many functions contained in PowerPoint such as add text, titles, labels, or other images.
If you capture additional images, then a new slide will be added if you have the
New Sheet
item checked in the "Settings" form. If you have the
Same Sheet
item checked then the capture will be added to the same slide.
These will appear in the same presentation. If you already have an existing presentation open it will not be disturbed. Cappy will only write to the presentation it has created. You can save or close the presentation at any time. If you close PowerPoint completely then a new presentation will be created the next time you use this function to send an image to PowerPoint. If the image is larger than the slide, it will be scaled down to fit the slide. You can then use the Format Picture command in PowerPoint to resize the image. This method will allow you to maintain the original ratio of width to height (aspect ratio) so the image does not become distorted. Or just click and drag the edges of the image to resize, but this method will sometimes introduce distortion. Cappy will work with any version of PowerPoint. Of course, you must have PowerPoint installed on your computer to use this function.
Opens Microsoft PowerPoint, creates a slide, and then puts the image on the slide. PowerPoint will open in Landscape mode (wide) if you have the PowerPoint
Landscape
item checked in the "Settings" form, or in Portrait mode (tall) if you have the PowerPoint
Portrait
item checked.
It can also place a line of text in an editable text box on the lower left, and the date on the lower right. You can turn these text boxes on or off in the
Settings
form. The lower left text box can be customized in the purchased version only. Once the slide is created both text boxes can be edited or erased in PowerPoint. You can then do any of the many functions contained in PowerPoint such as add text, titles, labels, or other images.
If you capture additional images, then a new slide will be added if you have the
New Sheet
item checked in the "Settings" form. If you have the
Same Sheet
item checked then the capture will be added to the same slide.
These will appear in the same presentation. If you already have an existing presentation open it will not be disturbed. Cappy will only write to the presentation it has created. You can save or close the presentation at any time. If you close PowerPoint completely then a new presentation will be created the next time you use this function to send an image to PowerPoint. If the image is larger than the slide, it will be scaled down to fit the slide. You can then use the Format Picture command in PowerPoint to resize the image. This method will allow you to maintain the original ratio of width to height (aspect ratio) so the image does not become distorted. Or just click and drag the edges of the image to resize, but this method will sometimes introduce distortion. Cappy will work with any version of PowerPoint. Of course, you must have PowerPoint installed on your computer to use this function.
 Opens Microsoft Word, creates a document, and then puts the image on the document.
Word will open in Landscape mode (wide) if you have the Word
Landscape
item checked in the "Settings" form, or in Portrait mode (tall) if you have the Word
Portrait
item checked.
It can also place 2 lines of text above the image. The first line can be any text you choose. The second line is the date. You can turn these lines on or off in the
Settings
form. The top can be customized in the purchased version only. Once the document is created both lines can be edited or erased in Word. You can then do any of the many functions contained in Word such as add text, titles, labels, or other images. If you capture additional images they will be added to the bottom of the document. These will appear in the same document. If you already have an existing document open it will not be disturbed. Cappy will only write to the document it has created. You can save or close the document at any time. If you close Word completely then a new document will be created the next time you use this function to send an image to Word. If the image is larger than the document, it will be scaled down to fit the document. You can then use the Format Picture command in Word to resize the image. This method will allow you to maintain the original ratio of width to height (aspect ratio) so the image does not become distorted. Or just click and drag the edges of the image to resize, but this method will sometimes introduce distortion. Cappy will work with any version of Word. Of course, you must have Word installed on your computer to use this function.
Opens Microsoft Word, creates a document, and then puts the image on the document.
Word will open in Landscape mode (wide) if you have the Word
Landscape
item checked in the "Settings" form, or in Portrait mode (tall) if you have the Word
Portrait
item checked.
It can also place 2 lines of text above the image. The first line can be any text you choose. The second line is the date. You can turn these lines on or off in the
Settings
form. The top can be customized in the purchased version only. Once the document is created both lines can be edited or erased in Word. You can then do any of the many functions contained in Word such as add text, titles, labels, or other images. If you capture additional images they will be added to the bottom of the document. These will appear in the same document. If you already have an existing document open it will not be disturbed. Cappy will only write to the document it has created. You can save or close the document at any time. If you close Word completely then a new document will be created the next time you use this function to send an image to Word. If the image is larger than the document, it will be scaled down to fit the document. You can then use the Format Picture command in Word to resize the image. This method will allow you to maintain the original ratio of width to height (aspect ratio) so the image does not become distorted. Or just click and drag the edges of the image to resize, but this method will sometimes introduce distortion. Cappy will work with any version of Word. Of course, you must have Word installed on your computer to use this function.
 Opens Microsoft Excel, creates a spreadsheet, and then puts the image on the spreadsheet. It can also place 2 lines of text above the image. The first line can be any text you choose. The second line is the date. You can turn these lines on or off in the
Settings
form. The top can be customized in the purchased version only. Once the spreadsheet is created both lines can be edited or erased in Excel. You can then do any of the many functions contained in Excel such as add text, titles, labels, or other images.
If you capture additional images, then a new worksheet will be added if you have the
New Sheet
item checked in the "Settings" form. If you have the
Same Sheet
item checked then the capture will be added to the same worksheet.
These will appear in the same spreadsheet. If you already have an existing spreadsheet open it will not be disturbed. Cappy will only write to the spreadsheet it has created. You can save or close the spreadsheet at any time. If you close Excel completely then a new spreadsheet will be created the next time you use this function to send an image to Excel. If the image is larger than the worksheet, it will be scaled down to fit the worksheet. You can then use the Format Picture command in Excel to resize the image. This method will allow you to maintain the original ratio of width to height (aspect ratio) so the image does not become distorted. Or just click and drag the edges of the image to resize, but this method will sometimes introduce distortion. Cappy will work with any version of Excel. Of course, you must have Excel installed on your computer to use this function.
Opens Microsoft Excel, creates a spreadsheet, and then puts the image on the spreadsheet. It can also place 2 lines of text above the image. The first line can be any text you choose. The second line is the date. You can turn these lines on or off in the
Settings
form. The top can be customized in the purchased version only. Once the spreadsheet is created both lines can be edited or erased in Excel. You can then do any of the many functions contained in Excel such as add text, titles, labels, or other images.
If you capture additional images, then a new worksheet will be added if you have the
New Sheet
item checked in the "Settings" form. If you have the
Same Sheet
item checked then the capture will be added to the same worksheet.
These will appear in the same spreadsheet. If you already have an existing spreadsheet open it will not be disturbed. Cappy will only write to the spreadsheet it has created. You can save or close the spreadsheet at any time. If you close Excel completely then a new spreadsheet will be created the next time you use this function to send an image to Excel. If the image is larger than the worksheet, it will be scaled down to fit the worksheet. You can then use the Format Picture command in Excel to resize the image. This method will allow you to maintain the original ratio of width to height (aspect ratio) so the image does not become distorted. Or just click and drag the edges of the image to resize, but this method will sometimes introduce distortion. Cappy will work with any version of Excel. Of course, you must have Excel installed on your computer to use this function.


 to pick a new shape and then press the retry button. You can also use this shape box to change the shape of the current capture. For example, if you made the capture using a rectangle you can use this box to see what the same capture would look like as an ellipse. Try all the shapes to see which one looks best.


 For example, if you select 200 in this box the scale will be 200 percent or twice size. You can also scale by typing in a value from 1 to 1500 in the drop-down box.
 For example, if you select 50 in this box the scale will be 50 percent or half size. You can also scale by typing in a value from 1 to 1500 in the drop-down box.


 Use your
Credit Card
or
Use your
Credit Card
or
 Send payment by
PayPal
payable to:
ElegantPie@HotMail.com
Send payment by
PayPal
payable to:
ElegantPie@HotMail.com
 I am PayPal Verified. My Account Creation Date is May 30, 2000. Yes, I have been using this PayPal account for over TWENTY-FOUR (24) years.
| DOWNLOAD | PURCHASE | HOME |